
HAPPY VALENTINES DAY!
Hope your day is full of chocolate, valentines, kisses and bubble baths!
oh yea, and sewing!
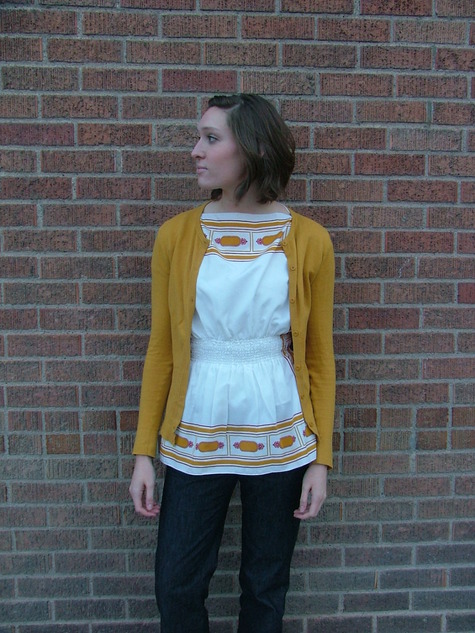
SHIRRED HANDKERCHIEF SHIRT:
STEP ONE:
Go to your local vintage or second hand store and find two handkerchiefs, preferably silk and preferably matching. If you can’t find a set, just go for two coordinating ones in the same size. make sure that they are rectangular or a very large square. Hold them up to yourself to see if they will be long enough.
Step 2 Take measurements
measure the distance across your shoulders that you want the neckline to be open. find the center front of both of your handkerchiefs and place a pin there. Now take the measurement you took across your shoulders (say you want a 10" neck opening) and place an equal length on either side of center front and center back (so you will have 5" on either side of the pin at center front and center back.)
Step 3 Armhole measurement
Measure from the top of the shoulder to a length you feel would be comfortable for an arm opening. Note that the opening for the arm will drape a little since this sleeve would be similar to a kimono or bat wing so you shouldn’t have a gapping hole there. I measured down 7". Mark 7" (or your own measurement) from the top an each of the four top corners (front and back)
Step 4 Sewing
Lay your handkerchiefs one on top of the other, right sides facing in. Pin (especially if your material is slippery) each point of measurement (either side of c.f. and c.b. and top/bottom armhole) together. Sew together using a 1/4" seam allowance.
I suggest 1/4 inch because otherwise the fabric hangs really weird around the neck edges on the shoulder.
Since you are using handkerchiefs that have already been made, there are no seam finishes!! Best part of your day, right?
If I were to make this top again, I would consider putting something like a key hole opening at the neck edge or even just a slit and doing a narrow rolled hem so it hangs open. If you follow the original instructions for the shirt I made, you will end up with a neckline similar to a jewel.
Step 5 Shirring the waistline
Decide where you want your shirr lines to be. If I make this top again, I will try doing a dropped waist instead of having Them at the natural waistline. Start with one line of shirring approx where you want it to hit on your body. I suggest trying the top on at this point to take this guesstimating. Sew a line of shirring. (to shirr fabric, simply get elastic thread and HAND WIND it into your bobbin somewhat loosely, there will be directions on your elastic thread for this…and then sew with regular thread on top. voila, easy.)
BE aware of how your seam allowances are sitting while you shirr, make sure they don’t fold or tuck.
Your first row of shirring will probably not be super gathered, but try the top on again and see if you like where that row fits on your body. if it is slightly higher than you want, shirr the next row 1/4 " below the first. If it is lower than you want, shirr the next row 1/4" above the first. Continue to create shirred rows until you are happy with the effect you have achieved.
Your first row of shirring will probably not be super gathered, but try the top on again and see if you like where that row fits on your body. if it is slightly higher than you want, shirr the next row 1/4 " below the first. If it is lower than you want, shirr the next row 1/4" above the first. Continue to create shirred rows until you are happy with the effect you have achieved.
If you find it difficult to form straight lines without a guide, when you are first guessing where you want your first shirr line to be, take the top off and lay it on a flat surface and draw a chalk line at an equal length on both the front and the back of the garment. If you find it hard to use the edge of your foot as a guide, continue drawing chalk lines where you want your next line to be.
Remember, you want your bobbin on the bottom because otherwise you will have elastic thread on the outside of your garment. So sew with your garment right side up.
STEP 6: FINISH and ROCK IT!
That’s it, your done! I’d suggest trying on the shirt after each shirred line to make sure you are getting the fit you want.
Have fun, hope you enjoy this simple project.
No comments:
Post a Comment