Showing posts with label tutorial. Show all posts

Thursday, October 17, 2013

Obsessed: Rustoleum Textured spray paint


The DIY projects are coming along strong here in Casa de Gordon!
One of my recent finds that I'm using in probably too many places around the house is this awesome textured spray paint. I'm a big fan of iron details (not so much curly, fleur de lis sort of iron, more industrial and minimalist?) but they are hecka espensive.

So, we've just been buying whatever shaped/functional item we can find at the lowest price and coating it with this awesome stuff. 

We found a great little whale statue for our bathroom last year, so we've been sticking with the theme. Recently, we found a rusty, oddly matted, watercolor of a whale at one of the many local Goodwill stores. The matting was a faded blue color and to match our bathroom it had to all be black, so I pretty much slathered the whole thing (cardboard matting included) in this rustoleum paint.


Someday I'll actually take a before picture.

Saturday, October 12, 2013

A little revamping...

We're getting things settled slowly but surely in our new place. We've been ransacking discount furniture stores, thrift stores, craigslist and pretty much any other venue we can find a deal in. The two latest projects we've completed is a chair and a dresser for our bedroom:

Before:


We found the chair at a Goodwill (checked thoroughly before it even left the store, the idea of bed bugs freaks me out to no end) and the dresser at Saint Vinnie's

One coat of Martha Stewart-Glidden Duo "Winter Day" later we ended up with these:

After:


We're super excited about the color and how they turned out. We only ended up using about 1/3 of the small can of paint we had purchased. 


Monday, June 4, 2012

Fendi: Invert Pleat Sheath Dress

Fendi: $1,850 

Here's the break down:
It's wool crepe, dry clean only. Of course, if you were to drop almost two grand on a dress you'd be all about dry cleaning, but I'm a college student and the coin-op laundry busts the bank sometimes.

Polyester Crepe (its a little thicker, and has a little bit less drape, also it's less breathable than wool crepe, but visually still pretty) $2.99/yd

and line with poly lining: $1.98/yd

You'll be needing a zipper for the back, and if you want a pattern to start with you can try this one: 

$5.50 at Burdastyle
The neckline will need to be raised and about 2 inches needs to be added in a seam along center front to create the third inverted pleat. A yoke will have to be created at the waist, and width will have to be added to the princess seams on the top of the dress. You can easily leave the cap sleeves off, but personally I like the dress better with a sleeve option.

---

Total costs are less than $20 for materials, if you're like me and like to pretend that you are getting paid the difference between your cost to recreate the look and the cost of the actual garment; and say you spend, 13.5 hours on it.

You just made somewhere around $135.55 an hour.
Woot!

Dry cleaning, here we come!


Monday, May 28, 2012

JCrew Hack: No. 2 Pencil Skirt

JCrew $138

This little floral skirt is one of my favorite summery things I've seen in a while. And since you can find a chambray and blue canvas sneakers ANYWHERE this look is super easy to re-create.

So, here's a quick tutorial on drafting a pencil skirt pattern
Or, find one you like on pinterest.

And here's some similar fabric:

Something to keep in mind when recreating a look that you like is that you may not always find a fabric that is exactly the same or even close really. So identify 2 or 3 main principles. 

1st: What strikes you most about the original item?
here: The floral pattern with the use of white and the boldness of the purple.

2nd: what is it made out of?
Here: cotton (with a hint of stretch), so you're going to want something also in cotton. Often if a high end piece of clothing is made out of something that is out of your price range (try finding decently priced Crepe De Chine, impossible) you can find a less expensive substitute.

3rd: Care.
here: This isn't an issue here, but there's a dress I have my eye on that is made of wool crepe. Now, I know that I will never dry clean that dress and chances are it'll accidentally get thrown into the dryer by a well-intentioned husband, so I'm looking for an alternative that I can just throw in the wash and not worry about.

---

happy sewing!

Monday, May 21, 2012

JCrew Hack: Big-Shot Dot Circle Skirt

JCrew $128

If you aren't familiar with a rectangular gathered skirt with a waistband, you can follow this tutorial (just use one layer of fabric and your measurmentx 1.5 because the JCrew skirt isn't nearly as full), or find it on Pinterest :)

You will also need a zipper and closures of your choice for this hack.

and this fabric for $8.98 a yard:


If you'll notice, the skirt doesn't have a stitching line along the bottom, this is because it has either a lining or a blind hem. To learn how to do a blind hem, check out this tutorial.

----

*Side note:*
Fabric.com is my go-to online fabric retailer, I've ordered from them numerous times and I know that I can trust their quality, but if you have a place that you can find this cheaper and know it will be good, go for it!


Monday, May 14, 2012

Another for the J. Crew hack

How cute would this be for summer?

JCrew $128

Fabric.com: $8.98 a yard

or

$15.98/yard

and if you're not familiar with making a gathered waistband skirt you can print out this pattern from Burda Style


Monday, May 7, 2012

Wish list...

I know I just bought fabric for a skirt, but here is another one that's in the works:


This one is positively COVERED in sequins...and is $850 from J Crew. 
Ouch.

So here's the ingredients to the version I'm cooking up:

Woven Lurex Seersucker Striped Fabric: $5.98/yard


and

 Glitter spray, about $5

Haha! Doesn't that just sound so ghetto-fabulous? Glitter painted skirt. Awesome. I've done my research though, and I'm feeling pretty informed that with the Lurex woven into the fabric that this little boost will give me the sheen I'm looking for. Also, since the fabric I found is lacking in the sequin department, I replaced that textural element with a seersucker, which will also help the glitter to reflect light in interesting ways, instead of along a flat surface.

----

I promise this is the craziest of my sewing list right now. :)

Tuesday, April 24, 2012

Tutorial Tuesday: How to ride a bike in a skirt


There are flowers and birds and bees and finally leaves on trees, which means it is primo bike riding weather!

If your a big fan of skirts, and also a big fan of bikes you may want to take into count these handy hints when your skirt encounters a breezy day while pedaling your bike.

1. The obvious: wear leggings or shorts. These can get really hot and take away some of the bare-legged breeze that benefits riding a bike in a skirt, but are a sure way to keep you modest.

2. Try a garter. You don't have to buy anything fancy, a knit headband (like they have at the dollar store) worn around your lower-mid thigh is great to attach a safety pin to. Simply remove the pin when you are off of your bike.

3. Angle your knees in towards each other a little bit. This gives the skirt less of a chance to throw modesty {and your dignity} to the wind.

4. Ride in lighter weight fabrics, I know that may seem counter-intuitive but heavier fabrics actually move up and down a lot more with your legs and catch wind better. Whereas, lighter fabrics ripple backwards instead of straight up.

5. Don't ride in anything shorter than knee length. Let's be ladies here.

6. If you are riding in a long skirt, you know that maxi you love, make sure your bike has a skirt guard to keep it from tangling up your skirt.

7. If you don't have a skirt frame or step through bike, try standing on a curb to get on your bike.

8. When cruising, extend one leg straight while keeping the other leg bent to minimize the amount of air being caught by your skirt.

9. Do some fancy tucking. There are many ways to tuck a skirt under your thighs that aren't obvious or awkward looking.

AND

10. You can always hold the hem of your skirt with your non-steering hand.


Happy biking!

Tuesday, April 3, 2012

Tutorial Tuesdays: Baby Ruffle Swimsuit

Okay, so it's no secret that I am absolutely in love with Lil Miss. She's by far my favorite niece (I'll update this status after I get another).

We are going swimming later today (a perk of living in a converted hotel: indoor pool. Win.)

But, since she's been growing like a little weed, she didn't have a swimsuit. 
Since I'm an awesome aunt and what-not, I whipped one up for her. Here's how:

What You Need:
A pre-ruffled fabric tank top 
(or pre ruffled fabric if you want to draft the top yourself)
(You want this to be a poly-spandex blend, a cotton blend will take heat away from the body and take forever to dry.)
(enough parenthetical inserts)
Scissors
A sewing machine
needle and thread
Your Lil Miss' measurements-- neck to between the legs, thighs, and around the widest part of the torso.

Optional: swimsuit lining cut to same measurements as ruffle fabric and serged together along all edges and flipped to wrong side through the crotch seam.

------

After measuring, you are going to essentially make a rectangle starting from the center front of the neck and going down, cut in between the ruffles adding a seam allowance only to the crotch seam as ruffle fabric is generally only two way stretch. The spaghetti straps are going to act as halter ties.

You don't need to add side seam allowances seeing as the fabric is a knit, and will also stretch further when in the water.

(if you aren't using an old shirt, simply add two straps to the top of a tube top type suit.) 

Cut along the side seams and cut the spaghetti straps where they are connected to the back. (I cut mine in the middle and now wish they were longer)


Right Sides together, fold the front of the shirt and sew down center back, try to line up the ruffles as you sew.


Flip the suit right side out and measure in from each side half the width of your Lil Miss' legs (Since it is on the fold). Cut in between the ruffles horizontally and then straight down. Sew together using 1/4" seam allowances.


Since the neck was originally made for an adult it will gap --even when tied in a halter-- So we are going to pinch in the neck (you can make this same alteration to formal or woven patterns, before sewing them up, for tops to eliminate gaping at the neck)

To keep things even, form a box pleat (two pleats facing each other) and sew.


Your pleat should look like this, each side measuring about half an inch:


I didn't care for the look of the pleat itself, so I made a little drapey bow to cover it. Simply take a rectangle of fabric. About 5" by 3" and gather it down the middle, hand sew it on.


And that's it! Quick little babe swimsuit!
You may want to fidget with the curve of the underarm area to suit your Lil Miss' needs.

Tuesday, March 27, 2012

Tutorial Tuesdays: Setting Pleats

I absolutely love feminine touches on clothes! One of my favorite girly touches are pleats and tucks, but if you've ever tried hand pleating something (even with a pleater board-ick) you know that it takes forever!

And, here's the big bummer, when you don't do anything to set the pleats; all the hours of measuring and ironing and pressing and pinning and basting are for not.

They will just come out in the first wash. :{ So here's a quick way to chemically (don't worry, you already have everything you'll need) set those pleats to end up with great looks like these:


(ohhh Pinterest...before I get sidetracked...) 

You will need: 
A spray bottle 
A Press Cloth (muslin will generally work)
1/2 c. white vinegar
1 c. Water
an Iron

Mix the vinegar and water together in a spray bottle (be sure your bottle has a fine mist setting...) As you pleat (however you decide to do this; basting, pleater board, measure and pin...) spray the fabric with the mixture until it is lightly damp, also spray the press cloth (if you are using a fabric with a high heat tolerance, you may not need the press cloth) until it is damp, place over pleats and iron. 

Repeat until all of your pleats are set. Now all your hard work won't come undone in the first wash!

Tuesday, March 20, 2012

Tutorial Tuesdays: Sponsor Style

I'm pretty excited to introduce a new sponsor this week!


If you are looking for a new blog look, or some great information on HTML, LDC Designs is a great place to start!

For today's tutorial, check out her easy-peasy guide on how to make your pictures the same width as your text. (Just follow the link above)

She also has pages full of DIY and Free things!
So, if you aren't already following her, you're going to want to do so quick!

cross


stinking adorable, right!?

Tuesday, March 13, 2012

Weekends and tuesday tutorials!

We had the awesome chance to go to my cousin's wedding reception.

We at great food, saw good friends and just hung out with the fam.

My sister-in-law and I also took our husbands (and little brothers) to an indoor 
Nerf Gun arena... (yes it was made of cardboard boxes)


it was. AWESOME! 


Anywho!

Today's Tutorial is just a quick four step one for when you're feeling like a homebody.

A sassy home body that is.


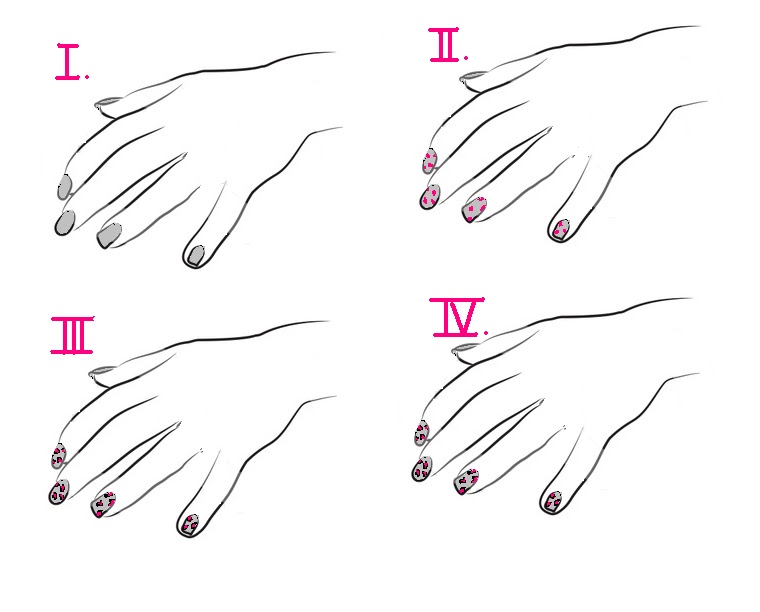
Cheetah Print Fingernails:


You will need:
3 coordinating nail polishes
1 for the background
1 lighter for the inner spots
and 1 darker for the outside of the spots
1 Bobby Pin or toothpick

(I used a gold, blush pink and maroon)

Step One: 
Prime your nails and apply your base coat.
(if your base color is transparent, add coats until desired color)

Step Two:
With the polish brush, make various sized splotches on your nails.
I found that for my fingers, 3 spots were the best number.
Don't worry about consistency in size, just don't make them too big. But if you do, not to worry! You can fix that in the next step.
let dry.

Step Three:
After the polish has dried. Take a bobby pin (with the rounded end still on) and dip it into your darkest color and trace around the outsides of your spots in a rough "C" pattern. If there are little wiggles or free standing dots, good job! It all adds to the effect.
let dry.

Step Four:
Be sure that all polishes have dried so you don't smudge your work, and apply a clear top coat.
Voila! You're done and super sassy with your cheetah nails and sweat pants!


A long lasting tip:
Instead of brushing the polish simply from top to bottom or bottom to top, stroke upwards and then curve the brush parallel to the end of the nail, in somewhat of an upside down L. This helps the polish not to chip off the ends of your nails!

Tuesday, March 6, 2012

Tutorial Tuesdays: Shirt to Yoga Pants

Double Tutorial Tuesday! Weee
Since the releasing darts tutorial is more of an informative-if-you-are-making-something deal, I thought I'd throw in this super quick, super comfy tutorial:

-------

I saw the idea to make a shirt into yoga pants on Pinterest, so I went for it!

(The original tutorial is here, mine is a little different)

Take a men's long sleeved t-shirt:
Small Shirt= Small Pants
Medium shirt= Medium pants
Large Shirt= Large pants
XL Shirt = XL pants

you get the picture.

 (Sorry this is upside down, I was in a hurry)

Step One:
Lay your shirt out on a large flat surface, making sure the side seams are lined up and cut off the sleeves and down the center. Next, cut off the neckline.


The body of the shirt will now be both of your pant legs.

Step Two:

Cut out two rectangles from the sleeves. They should be the same length as the top (by where the neck was) of your pant legs.


Open up each rectangle and sew them to each other on the skinny ends, then fold so the seams are enclosed.

Step Three:

Turn both sides inside out (so the previous serging is on the outside) and
Sew the side leg seams together on the outside edge.


Step Four: 
Turn one leg right side out and put it inside the other leg, matching up the curve of where the armholes used to be and sew together. Pull the leg back out.

Step Five:
You should have something that looks like pants now! To lengthen the waistline (highly suggested if you have any sort of fanny to speak of) add the waistband by matching up the side seams of the band to the side seams of the pants with the pants inside the waistband and the raw edges of the band and the pants facing up and sew together.

Step Six:

Put them on and go work out!


Happy sewing!


Tutorial Tuesdays: Releasing Darts

The next several Tutorial Tuesdays combined with this dress top will turn you into the ULTIMATE Modcloth  dress hacker!

When sewing (especially with woven--non stretchy-- fabrics) you will run into pesky little things called darts.


And oh buddy are they important! They can make or break the fit of a garment and can be converted into release (as in today's post) pin-tucks, pleats, gathers and seam lines. Whew!

On a women's sloper/block (pictured above) pattern piece, there are typically two darts (the one pictured only has one) one at the waist (shown) and another coming from the side to the bust. These darts must be fitted to each individual for a perfectly tailored fit...

Lucky for us, a lot of popular styles today are over-sized and drapey.

So using the thrifty dress from a past Thursday, 


lets talk about releasing darts.

The top for this dress pattern can be found (for free!) on the burdastyle  website. 


I made several changes to the pattern based upon personal opinions of modesty (sleeves and length) and (at the time) personal distaste for zippers.

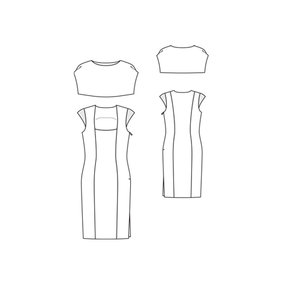
As you can see in the outline of the dress, there is a jabott of sorts that I also omitted. 

To avoid putting in a zipper, while still using a woven fabric, I converted the waist darts to release. What this means is simply, instead of sewing the darts closed, I left them unsewn. 

Referring back to the top picture of the front sloper, you can see the sew line on the dart. Just don't sew it, you rebel you. 

Since converting the darts to release made the top too big at the waist, I gathered in the excess fabric to the skirt with an elastic encased in the seams. (Darts released and gathered)

With these little steps I was able to create a dress that can still fit over the head and bust without installing a zipper in the equation. Easy peasy, and now you're a pro. Even if you don't have your own slopers/blocks (which most people don't) you can still easily manipulate any commercial pattern (as I did with the Coffee date dress) into whatever you like.

With todays tutorial (if you can really call it that, it was so easy) you can recreate dresses similiar to these:


Tuesday, February 28, 2012

Tutorial Tuesday: Fringe Heart Shirt

I was shopping around with my mom and sister in law, when we found this cute little shirt:


We thought it was so fun, we decided to make our own (cheaper- seeing as it was $20+) versions of them.

I opted for an asymmetrical hem with the back being longer, so that's what I'll show in this tutorial. You can also draw a shirt tail hem (like the original) by cutting a large, wide, U shape out of the front and back of the shirt-- and follow this tutorial for the rest.

Materials:
an over-sized or loose shirt
chalk
scissors
pins
thread
a sewing machine


Step One:

Match up the side seams of your shirt and lay it out flat. Draw a curved line that is higher in the front and lower in the back with chalk. Draw a parallel line 1-3 inches below that (the strip between the lines will be used to make the heart, so if you want the fringe to be longer, make the strip wider)

I'm pretty tall, so I made the back come down as far as possible, with a crop in the front. You can also make this into a full cropped top by simply cutting as high as you want the shirt to hit- you can get some extreme fringe that way!


Step Two:

Cut along each of your chalk lines.


Make sure that where your line starts, and ends are at 90 degree angles to the fold otherwise you will get little triangles instead of curves.

You will end up with something that looks along the lines of this.


You can save the hem piece to add embellishments - I'm just braiding mine into a head band. Fold the strip you cut out in half width-wise (if your strip was 3" it will now be 1 1/2") and set aside.

Step Three:

Trace a heart onto your shirt. If you aren't confident with your free-handing capabilities, create a template out of newspaper, or print one out.
I opted for a larger heart so the top created a sweetheart effect above my bust. Also, if you are starting with a V-neck make sure the two points of your heart line up with the neck line, otherwise your shirt will be obviously skewed looking. 
(You can draw a line down center front with chalk to help you with this.)


Step Four:

Now that you have your shirt prepped, take your strip of fabric and begin cutting fringe into it. if you want the looped look, like the original shirt; snip along the folded edge of the curve to about 1/4" away from the raw edge. If you want a more western feeling fringe- don't fold the strip in half and simply snip from one side up to about 1/4 " away from the other edge. You can then tug on the fringe to make them curl, or leave them flat.

(This works best if you also get hubby's foot in the background as you take pictures while you are sprawled across the floor, surrounded by fabric)


Step Five:

Cut your fringe where the side seams are and pin each piece onto each side of the heart. You want to get rid of the bulky seams and if you try to do this in one piece you will more than likely get a more rounded, rather than pointed, dip and bottom of the heart.


Step Six:

Using a wide zigzag stitch (so to still allow stretch and also catch all of edges of the fringe strip) carefully sew around the inside of the heart (you can also have the fringe on the inside and sew on the outside as in the original shirt) 
Make sure you are not stretching the shirt too much as you sew, otherwise you will get big waves in the fabric. If your machine has a needle down position, I'd suggest using it to navigate the curves and corners more easily.

And wallah! Your very own (under $5) fringed heart shirt